

Hi everyone! If you had just come from the uber talented mixologist and crafter, V’s blog, then you are in the right place! Welcome to our monthly blog hop where my squirrel sisters and I challenge ourselves by using stuff in our stash that we have squirreled away!

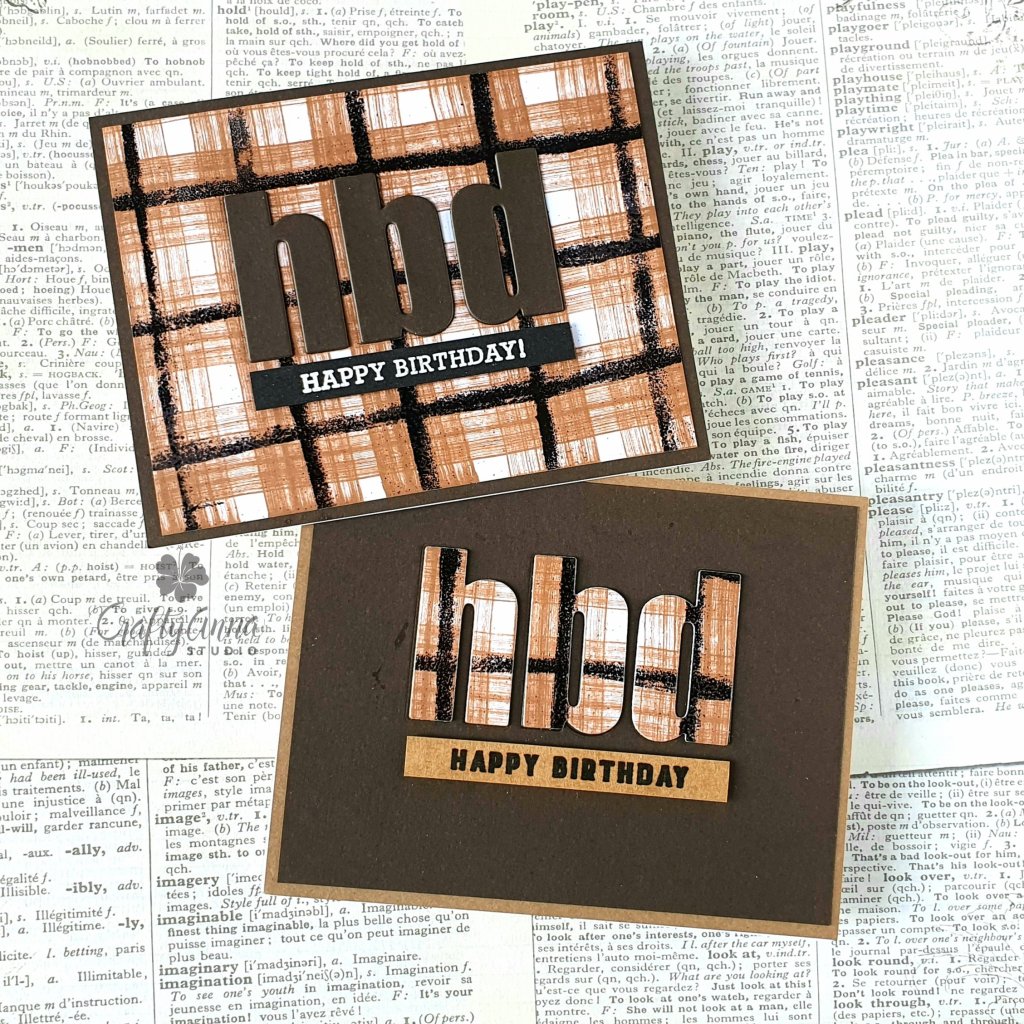
Our theme this month is alphabet dies and birthdays. I needed a stack of masculine birthday cards and I needed them fast! Alpha dies are perfect to use for masculine cards, specially the large bold ones. But first I needed to create some “masculine” backgrounds to highlight the alpha dies.
I thought it would be great to revisit a technique I did about a year ago called ink swiping. I’ve seen a few crafters on Youtube call this technique “Swinking”. I would step up the technique by adding something extra by using embossing powders in my stash that I have had for more than four years of which I either never used or hardly ever use! Here is the link to the video on how I created these backgrounds.
Since I needed a whole stash of masculine cards, I decided to go for a “two fer” technique using Alphabet dies. The dies I used for these cards are the Lowercase Bold Alpha dies from Altenew. These are my go-to to create personalized or custom sentiments on cards. In this case, I will be using h, b & d, which is the acronym for Happy Birthday.
I took the dies and lined them up on the grid of my glass mat. I spaced them out evenly and used the lines on the grid mat to align them. When I was satisfied with the alignment, I took a couple of strips of washi and placed them on top of the dies. This held them together.

Then I took it off the mat. I took my backgrounds and placed them on the grid mat. I used the grid mat to align the dies across – generally just eyeballing the placement.

But if you are not confident in eyeballing the placement, you can always use a t-ruler to make sure its straight on the paper.

I took it to my die cutting machine and die-cut out the letters. After die cutting, I made sure I kept the inside of the letters too as I will use them when I do the inlay. I did the same on coordinating plain cardstock. Then I switched the letters, the plaid ones will go to the plain background and the plain one, will go to the plaid background.

I cut down the the plaid background to 4″X5.25″ and adhered it to a coordinating plain card base. Before I in-laid the letters, I die-cut two extra sets of letters from scrap cardstock and inlaid them. Then I added a sentiment “Happy Birthday” across the bottom.
Here are the other cards I made:

Here is one with a gender neutral color palette:

Hope you were inspired to create your own plaid backgrounds! You can even change the color palette for your holiday cards!
Next on the hop is the super smart, funny and creative, Karen!
‘Til next time!
❤️
Anna
Thank you for visiting my blog. You can also find me on Instagram, YouTube, Pinterest and Facebook.
PRODUCTS USED:

Love them ! They look awesome ! I really like the plaid effect and the colors you choose.
LikeLike
Thank you so much Lounon! ❤
LikeLike
I love how these all turned out! My fav was the olive and navy combo… reminds me of my dad. I’m thinking the blue and marigold card could be masculine or feminine. And this gave me an awesome idea to CASE your layout, but instead of swiping the ink for a plaid look, swipe to create the look of wood. You could even score the cardstock first if you wanted it to look like woodplanks or shiplap. I wish I had time to go do it now before I forget! And I’d love to try the plaid idea for Easter cards since I never seem to have good Easter paper or backgrounds. For that matter, somewhere hidden in my stash is a plaid builder stamp set that is still virgin photopolymer. Now if only all this mojo will flow when I finally have time to play! Thanks for the wealth of inspiration, my talented friend!
LikeLike
Thank you so much Karen! Which reminds me I did make one about a year ago trying to mimic wood. But I didn’t think of scoring it to look like wood planks! What a wonderful idea! I love how we can inspire each other 💕
LikeLike
Great masculine cards, Anna! And how fun to make two out of one background! Thanks for showing this technique: so quick, easy and pretty 🙂
LikeLike
Thank you so much Bory! 💕
LikeLike
I LOVE all of these Anna, especially the gender neutral set. That blue just pops!!! These turned out just fantastic! 😍
LikeLike
These are AWESOME!! I love how you made the plaid with some good old ink swiping, such a smart idea!!!
I made some a couple of years ago with watercolour, but this is so much easier! I will DEFINITELY be trying this! Thank you my super talented friend!!
Your cards are all fabulous too!! Absolutely perfect!!!!!
Sending love and craft hugs! ❤
LikeLike
Thank you so very much for your kind words, my friend! 💕
LikeLike