

Hi everyone! Are you ready for a fun shaker card tutorial? I had just finished taking the Altenew AECP Cards in Motion class given by Ashley Tucker as part of my Level 3 requirement. This class is all about interactive cards!
One of the lessons is creating shaker cards. I’m going to step it up a bit and make a multi-layer shaker card.
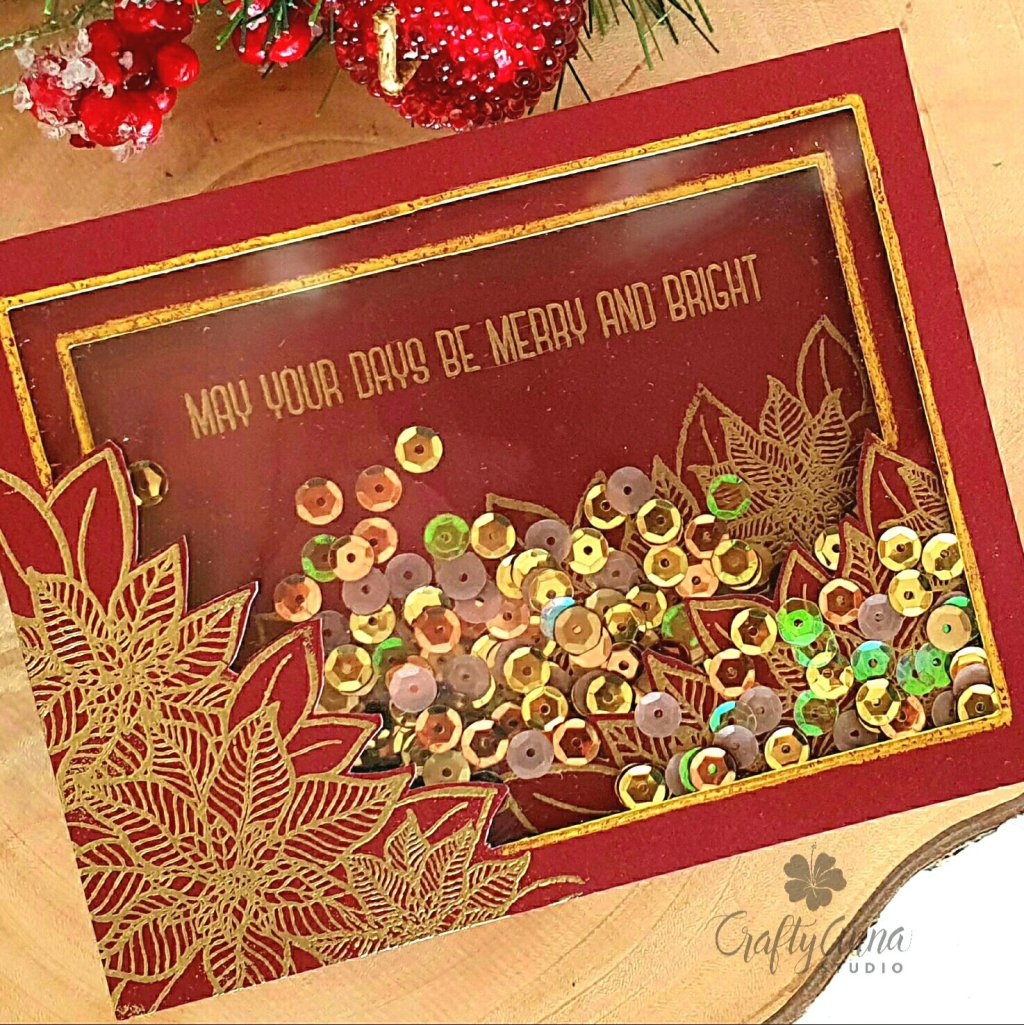
I chose the Altenew Holiday stamp set for this project inspiration. I wanted to keep the image fairly simple to bring out all the shiny details from the embossing and the sequins in the shaker.
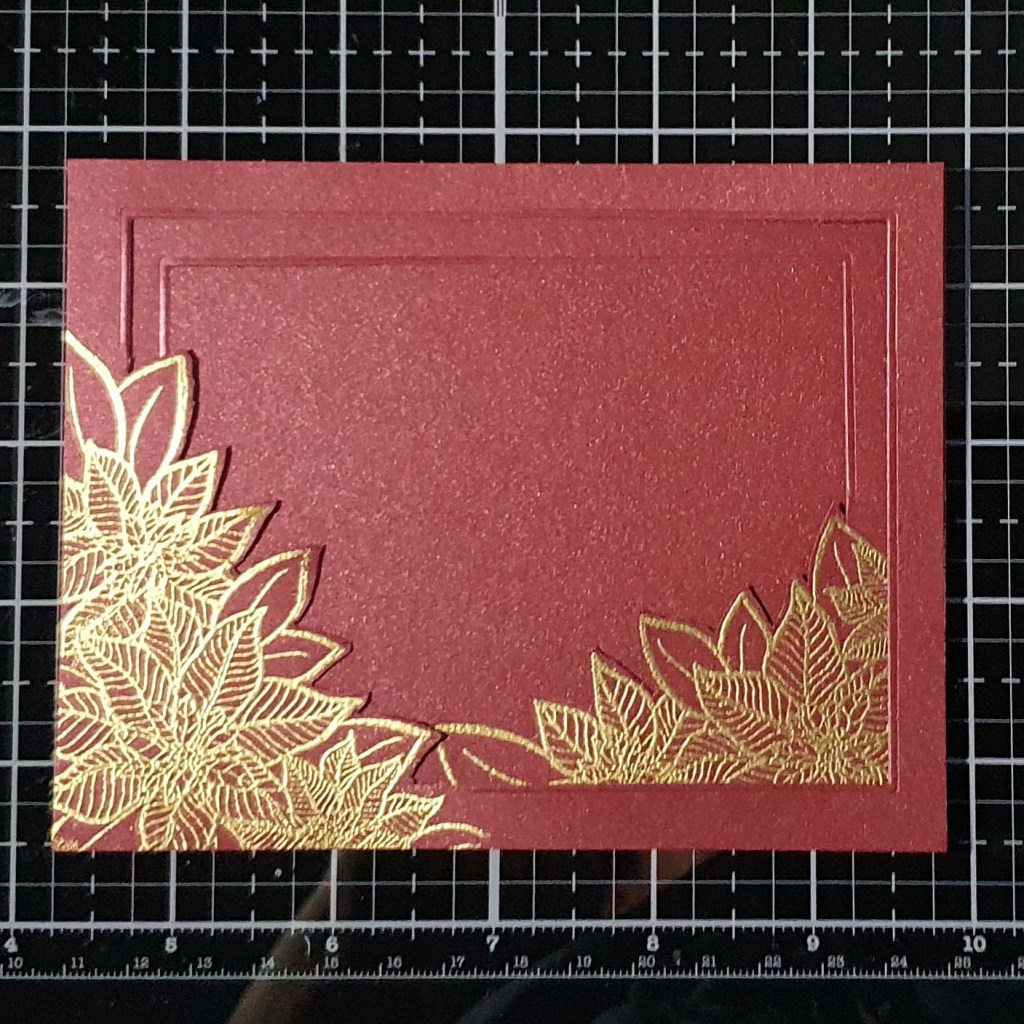
I took the poinsettia stamp and heat embossed it with Antique Gold embossing powder on the lower left hand side of a horizontal pearlized burgundy cardstock panel. This will be the front panel. Then, I did the same on another cardstock panel but this time on the lower right hand side. This one will be for the middle layer.
To create the frame, I took a rectangle die that was about half an inch smaller than the cardstock and placed it in the middle of the panel. I lined up the top plate on my die-cutting machine where the frame was but placing it right before the leaf on the edge. Anything under the plate will cut.

I did the same for the other side of the paper by turning the paper, making sure the top plate does not touch any part of the poinsettia. Once my frame was all cut out, I fussy cut the flowers out to complete the frame.
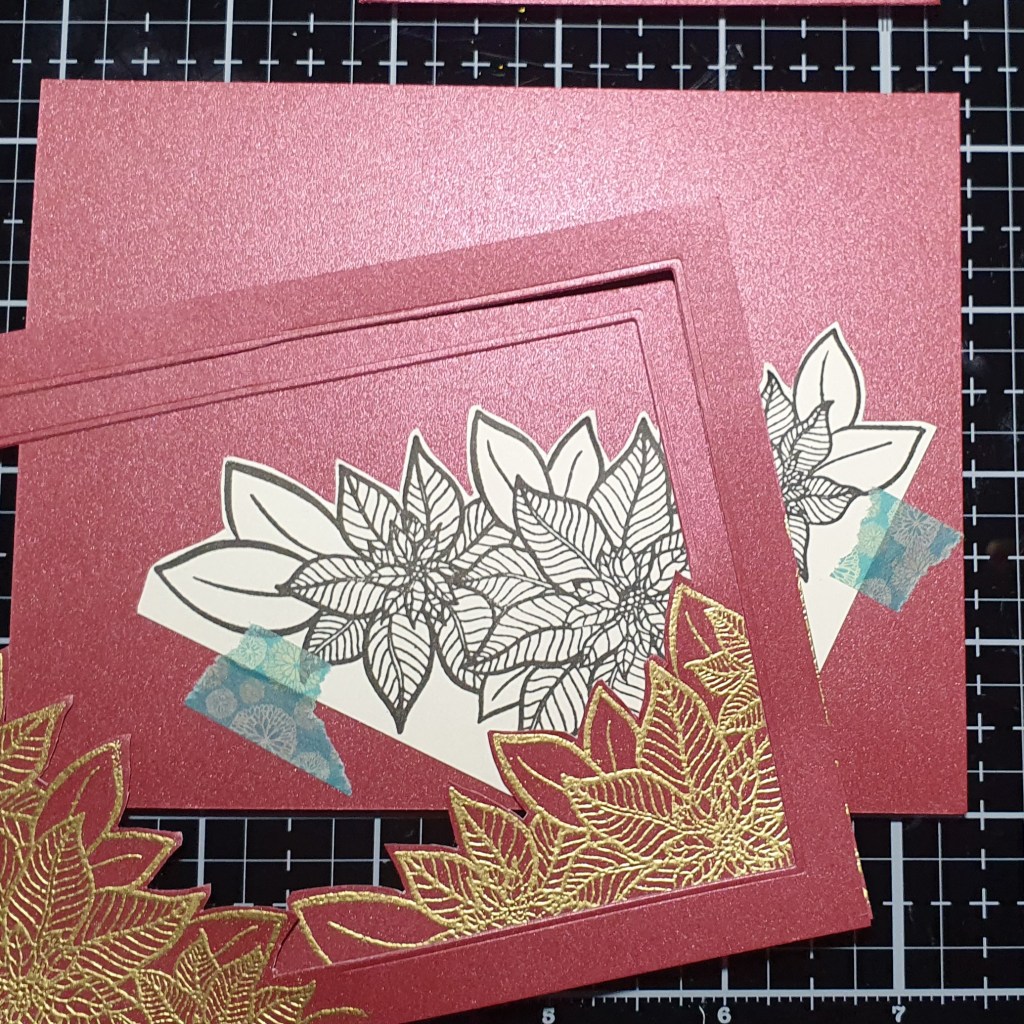
Then I did the same for the other panel except that I used an even slightly smaller rectangle die.
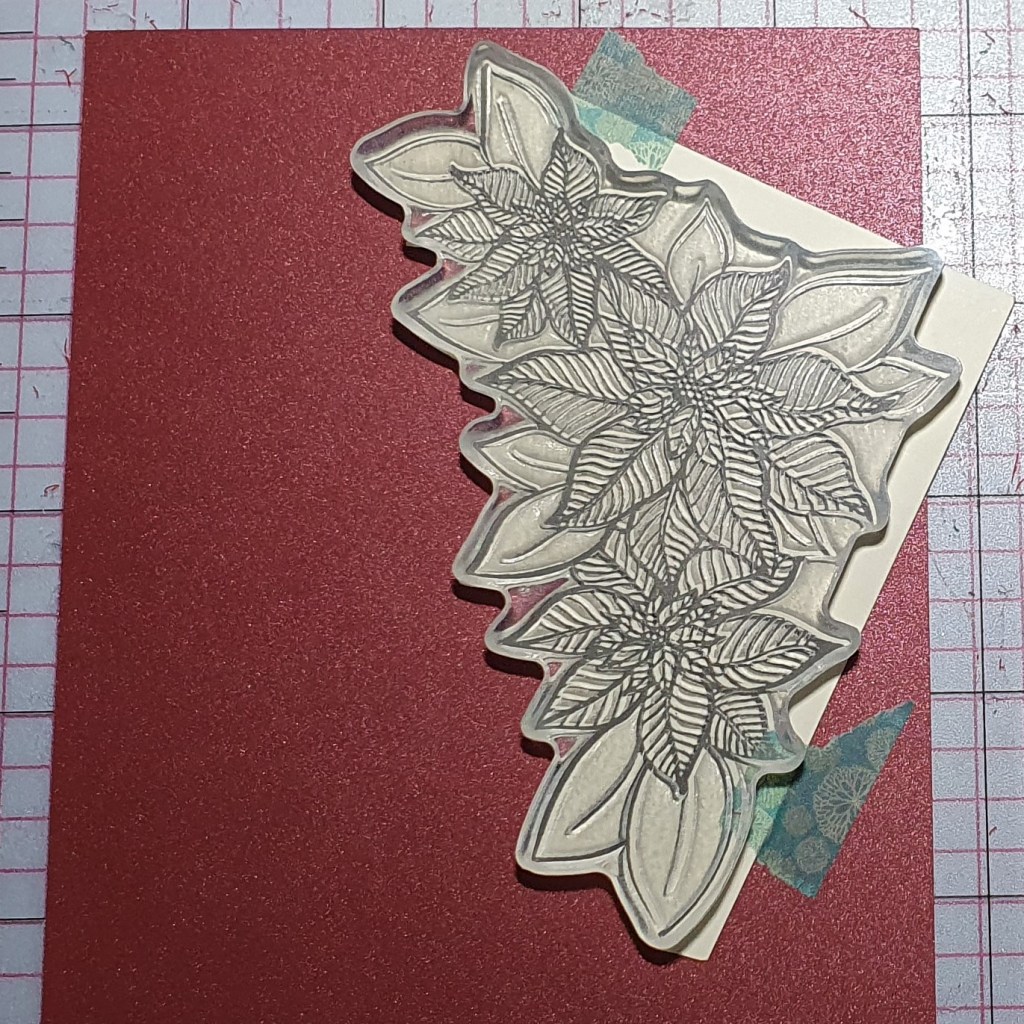
For the bottom layer, I gold heat embossed the image in the middle. To determine the right position of the base layer, I stamped out and fussy cut the image on scrap paper and placed it behind the frames. Once I was happy with the position, I taped it in place.
Then I placed the cardstock in my Misti and positioned the stamp on top before closing the door. I then removed the scrap cardstock and proceeded to stamp with Versamark ink and heat embossed it with the same embossing powder.
To enhance the framed edges, I used Enchanted Gold paint from the Metallic Watercolor set. All I did was follow the indented lines around the frame made by the rectangle die. I could have used an embossing pen and gold heat embossed it, but I liked this effect better as it gave a more of a handmade feel. I also gold heat embossed the sentiment “May Your Days Be Merry and Bright” also from the same Holiday Flowers stamp set.
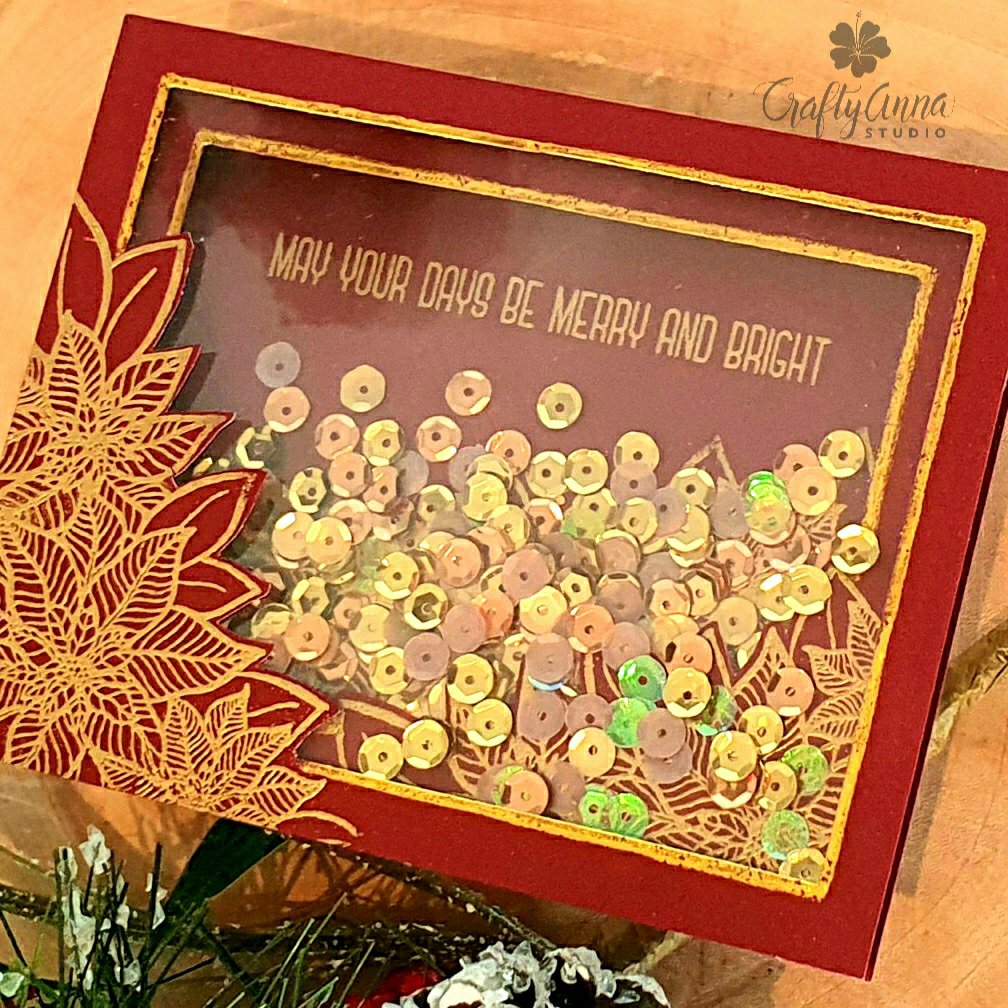
Once I had all my elements in place, it was fairly easy putting the shaker together. First, I adhered clear acetate behind both frames. I paid close attention to the adhering the flower tips to the acetate on the second layer so that it would not catch the sequins.
Then I added foam tape all around the back of each frame. You may need to double up the foam depending on how bulky your sequins are. I did not have flat sequins so I doubled up the foam tape on the middle layer but only one layer of foam tape on the top layer. I added a lot of sequins on the base of my card before adhering the middle layer. Then I added a little sprinkle of sequins on top of the middle layer before I placed the top layer.

I really loved how this turned out! The extra layer of acetate gave the sequins a more controlled movement. I could have also varied the colors of sequins for the bottom layer from the top layer for more interest!
For more fun interactive cards like this, please check out Cards in Motion class. There are a ton of techniques to try out!
Hope you were inspired!
‘Til next time!
Anna
Thank you for visiting my blog. I truly appreciate it! You can also find me on Instagram, YouTube, Pinterest and Facebook.

Materials used (and other suggestions for alternatives):
Note: I am affiliated with some online stores including Altenew, Concord & 9th, Hero Arts, Brutus Monroe and Trinity Stamps. If you use any of the links above, I get a small commission from these wonderful shops at no extra cost to you. Thank you for your support!

Such a pretty card. Thanks for sharing!
LikeLiked by 1 person
Thank you for visiting! 💕
LikeLiked by 1 person
This is gorgeous! I will have to give the technique a try. I have made Multi-layer shakers but your technique seems easier than the method I use! Thanks for the tutorial!
Hugz!
Chana Malkah
LikeLiked by 1 person
Thank you Chana!💕 I’m so happy you found my tutorial helpful 😊
LikeLike
This is a great take for motion. I like the idea for the multi layers as well as the painted border.
LikeLiked by 1 person
Thank you!
LikeLike
This is super FANTASTIC!!! A double layer shaker!! How exciting!!
LOVE LOVE LOVE
Thank you for submitting your gorgeous work to the AECP assignment gallery.
LikeLiked by 1 person
Thank you so much Erum! This was so much fun to create 😊
LikeLike
Gorgeous!!!
LikeLiked by 1 person
Thank you!
LikeLiked by 1 person